Pages

Peppermint Poke Cake (Gluten-free)


'Tis the season for all things PEPPERMINT!

I couldn't resist sharing this recipe because it is super easy, super tasty, and super festive.  Super!

"Why is it gluten-free?", you may ask.  Ah well, without delving into too long of a story, my oldest son was born with severe eczema and allergies.  All these years we treat the symptoms with ointments and lotions, and prescription medicines.  Recently though he started getting severe chest pains, and soon after was diagnosed with acid reflux.  That ailment I could relate to, and boy, it is no picnic.  We started cutting out all the foods you would if you have acid reflux, and saw no big improvement.  That's when I decided to try gluten-free and see if he improved.

Why did I decide to do that?

Well, I had already familiarized myself with gluten-free foods because my step-dad was "recently" diagnosed with the allergy.  I had even offered up the occasional gluten-free goodie at the farmers market.  In my research, I came across the correlation between the gluten allergy and eczema and acid reflux.  In a kind of a "no-brainer" moment, I decided that it doesn't hurt to see if it helps by cutting the gluten out!

I'm certainly NO EXPERT, and that is a disclaimer!  We've talked with our son's allergist and doctor about this diet and he has not been diagnosed with Celiac's Disease or a gluten-intolerance.  The suggestion was, try the diet, and if it helps then stick with it.

Now, while our son would never say he likes being gluten-free (because he doesn't) he will admit he feels a lot better.  No more upset stomachs and quick trips to the bathroom.  No getting up at night complaining of chest pains.  No more prescription reflux medicine.  And no more nasty, itchy red spots all over his skin.  So right now we're sticking with it.  I try to make the diet easier by making the occasional treat, like this Peppermint Poke Cake, which can easily be made Not-Gluten-Free!

Make this holiday, pepperminty, moist Poke Cake, with or without the gluten, and you'll have some happy campers either way!


Peppermint Poke Cake 
adapted from Something Swanky

-1 box Gluten-free Chocolate Cake Mix (I used King Arthur brand)

Prepare the cake mix according to directions on box.  Pour into a greased 9x13 pan, and bake as indicated.  I baked my cake for 28 minutes.

-1, 14 oz can sweetened condensed milk
-1 1/4 c. peppermint mocha coffee creamer, divided (I used International Delights)
-1, 15 oz. bottle of York Peppermint Sundae Syrup
-12 oz. container Cool Whip
-6 Glutino chocolate creme sandwiches, crushed (like Oreos)
-Andes Peppermint Crunch Baking Chips

Once you've removed the cake from the oven, let it cool on a wire rack.  When pan is cool enough to touch and it feels just slightly warm on bottom, use the back of a wooden spoon and poke holes throughout the entire top of cake.  I also like to use a serving fork to poke smaller holes around cake.

In a medium bowl, combine sweetened condensed milk and 1 cup of the peppermint mocha creamer.  Pour slowly and evenly over the cake allowing the milk mix to soak down into the holes of the cake.

In a small bowl, mix peppermint sundae syrup with 1/4 cup of the peppermint mocha creamer.  Spread evenly over the top of the cake.  

Dollop the top of the cake with the 12 oz. of Cool whip, using a spatula to spread evenly.  Sprinkle with crushed cookies and Andes peppermint chips.

Return to fridge to let the cake cool completely and soak up all the pepperminty goodness for at least 2 hours.  4-6 hours if you can manage.

Cut cake and serve to all your loved ones!  Trust me when I say, they won't notice it's gluten-free!

Merry Christmas and Happy Holidays to ALL!  


P.S.- The blog will NOT be going gluten-free!  You may see the occasional "G-free" item.  If you are gluten-free, I'm new at this, and if you see an error and think my item is not gluten-free, please let me know!  I try hard and I read all labels and often double check myself.  Just because it's gluten-free does not make it healthy, as you can see in this recipe!  You can catch some other gluten-free recipes on my G-Free board on Pinterest!

Building a House

Building a house is a walk in the park.  That's what "they" say right?  No?  No, that's not what they say?  Okay, you're right.  It can be stressful and trying on the patience (very trying because I've never had much of it), but I feel ungrateful if I complain because I'm building a freakin' house.  I'm lucky and I admit it.  I won't even complain about the gray hair that I never had before.

We started this whole process over a year ago.  We signed our contract in April of this year and broke ground in June.  Now we are winding down (or perhaps up?) and all the minor details are being worked on.  Picking cabinet hardware, hanging lighting, painting trim, etc...

Will we be in our new house to celebrate Christmas?  Alas, no.  My parents get the pleasure of still stuffing all of us and our animals in their house a little longer.  This also means no Christmas goodies from this lady and that's a first in many years.  Even the year my dad was ill, I was a mad woman in the kitchen.  So trust me when I say I would if I could.

This also means, I appreciate all of you who still check out my blog because I haven't had anything new in a million years!  But man 'o man, will I have some new stuff when I'm in my new house because I have these beauties:

KitchenAid Architect 30-in. Convection Double Wall Oven
Hark!  I hear the angels singing!  And even better?  We've got 27 solar panels to offset the electricity I use while baking all those goodies.  Which I think makes them all the sweeter.


Okay, so the kitchen is still a work in progress but it has come a long way.  I'll show you!  This is the start of it:

This is the view from the family room.

This is the view from our mudroom/hall.

This is the view standing in my kitchen at the window, looking towards the dining room.

The kitchen looked this way for a long time.  That's because it needed electrical run, lighting, insulation and eventually drywall.  Once the drywall went up it felt like a new space.  Yes?  Much better than staring at wall studs.


This room is my PANTRY!  Yes.  A PANTRY!!!  EEK!
So this is the point that I start getting really excited because the stuff I'm interested in starts happening.  Up to that point it was 2x4's, insulation, drywall, blah, blah, blah.  Then it happened.  Paint!  Floors!  Cabinets!   

That cardboard box houses my kitchen sink.  A Blanco Cerana Fireclay 30-in. Apron Front Farmhouse Sink.


That is a tiny island you are seeing.  I'll explain.


A kitchen! A kitchen!  I can see it now!
The kitchen was painted in Benjamin Moore Edgecomb Grey.  The flooring is Vahalia Birch in wide plank and it is laminate.  With kids and dogs, this was the best option for now, and we love the way it looks!

Soon I will have countertops, and I chose Silestone Quartz in Tebas Black with a suede finish.  Which means that is not as "shiny" but more matte, and doesn't appear as dark as regular Tebas Black .  It also doesn't have a slick feeling, which will take getting used to at first.


However, my tiny island will have Carrara Marble.  Perfect for keeping dough and the butter in it, cool.


Why is the island so tiny, you may wonder.  Well, I'm a 5'1" lady and as much as I ask Santa for longer legs this Christmas, I'm going to assume that I won't be getting any taller (but most likely shorter) as the years pass.  Before, when I had to work with dough I had to stand on my tippy toes to roll and knead.  Since I have the good fortune of building a house, I wanted an island that works for me!  So if you're a tall person coming into my kitchen just watch out for your knee caps!  HA!  Okay, it's not that tiny.

What's left?  Countertops.  Obviously.  Another coat of paint.  Appliances.  And then lighting.  I'll make sure to have another (perhaps final) post on the kitchen so you can see it all together.  Then hopefully soon after that it will be back to delicious recipe posts!

Catch me on Pinterest!  Now I'm pinning on the Christmas Board.

So if you have specific questions about the build, I'd be happy to answer and give all the details I can.    And yes, this part is fun!  However, we are running into hiccups like lighting needing to be moved, and new electrical to be run that was missed, doors that need to be changed because wrong ones came in, and the fact that it's the holidays and getting people to work in a timely fashion seems difficult.  When it all seems like a lot I just look from our porch at our new back yard,


that I can call these lovely, goofy, and amazing people mine,


and I know I'm truly blessed and can handle any hurdle, big or small!


Whiskey Caramel Banana Bars


Over-ripe BANANAS!  A gift from the dessert heavens!

Do you need to find a recipe for those bananas that have been sitting on your counter too long?  You've come to the right place.  I can't even remember the last time I ate a banana when it wasn't baked into something.  That could be abnormal, eh...possibly unhealthy.

Okay, so let's agree, eat one banana, then bake the rest!


Whiskey Caramel Banana Bars
adapted from Une Gamine Dans la Cuisine

Crust:
-1/2 c. unsalted butter, melted
-3 c. graham cracker crumbs
-1/4 c. light brown sugar, packed
-1/4 tsp. salt
-1/2 tsp. cardamom (can be replaced with cinnamon)

Filling:
-3/4 c. unsalted butter, browned
-3 ripe bananas, mashed
-2 eggs, room temperature
-1 1/4 c. light brown sugar, packed
-1 Tbsp. whiskey (I used Maker's Mark)
-1 c. flour
-1/2 tsp. salt

Glaze:
-1 1/2 c. powdered sugar
-1/4 tsp. salt
-1 Tbsp. whiskey
-2 Tbsp. milk

-Salted Caramel Sauce for drizzling

Preheat oven to 375 degrees F.  Line a 9x13 pan with parchment paper and coat evenly with non-stick cooking spray.  Combine the crust ingredients in a bowl and stir until mixture resembles wet sand.  Spread crust mixture evenly into prepared pan and press down firmly.  Bake for 5 minutes and remove from oven.

Turn oven off.  Brown your butter by placing the 3/4 c. butter in a light bottom pan over medium heat.  Butter will melt and start to foam.  Watch butter carefully and start stirring because the butter will start to brown and give off a "nutty" aroma.  Once the butter is a nice dark brown, remove from heat and pour butter into bowl.  Let cool (this can be sped up in the fridge).

Preheat oven to 350 degrees F.  In a large bowl, whisk mashed bananas, (cooled) browned butter, eggs, brown sugar, and whiskey.  Add the flour and salt and fold into the batter until combined-no large lumps of flour.  Pour banana mix over graham cracker crust and spread evenly.  Bake for 30-35 minutes.  Remove from oven and let bars cool on a rack.

In a bowl, add powdered sugar and salt.  Whisk in whiskey, and then slowly whisk in milk until you get your desired pouring consistency.  Add more or less whiskey/milk depending on how strong you want the whiskey flavor.  Pour over your bars and spread around evenly.  Drizzle desired amount of salted caramel sauce over the top.  I use Trader Joe's salted caramel sauce, you can find your own, or make your own!

Cut and enjoy!


I would like to make these having brown butter in the crust as well, but I didn't have time for that when I made them the first time around.  The banana part is almost cake-like and has that nice crust for  contrasting texture.  The glaze adds a nice sweetness but carries a lot of the whiskey flavor.  I thought the bars had a subtle spicy finish from the whiskey and cardamom.


Other banana recipes of mine to enjoy:
~Kicked-Up Banana Muffins
~Chocolate Covered Banana Whoopie Pies


Coffee Toffee Brownies


 I hope you weren't looking for a plain brownie.  And I hope you enjoy coffee and dark chocolate.  Together.

I've said it in the past, that coffee really intensifies the chocolate flavor in a lot of baked goods.  I add strong brewed coffee to my favorite chocolate cake recipe for instance.  You can't taste the coffee in that, but you can most certainly taste it in these brownies!  But that is what I want, and so this is your fair warning if you don't like coffee!  So move along, you weird non-coffee lovers! ( I still love you, though)


Symphony Bars and toffee bits add a wonderful buttery crunch and texture that also make these brownies a little more unique.  But what really takes these brownies over the top is the coffee glaze.  I'm telling you, that the glaze is completely optional, but its touch of caramel color and sweetness really balances out the deep, dark chocolate flavor of this sophisticated brownie.


*This is a large pan!  You can half the recipe, just watch your baking time!

Coffee Toffee Brownies
adapted from Ina Garten

-1 lb. unsalted butter
-1 lb. bittersweet chocolate chips
-6 oz. unsweetened chocolate, chopped
-7 large eggs
-3 Tbsp. instant espresso coffee granules (link)
-2 Tbsp. vanilla extract
-2 1/4 c. sugar
-1 1/4 c. flour, divided
-1 Tbsp. baking powder
-1 tsp. salt
-3, 4.25 Symphony Bars, chopped
-4 oz. (half a bag) Heath toffee bits 'o brickle, divided

Line a 10x15 pan with parchment paper and coat with non-stick cooking spray.

Place a large bowl, containing both chocolates and butter, over a pot of simmering water.  Stir occasionally and remove from heat once chocolate and butter are melted and smooth.  Cool slightly to where chocolate is warm to touch.

Meanwhile, preheat oven to 350 degrees.

In a large bowl, stir together eggs, coffee granules, vanilla, and sugar.  Slowly stir in warm chocolate until combined.  Set aside and let mixture cool to room temperature.

In a small bowl, whisk together 1 cup flour, baking powder, and salt.  Fold into cooled chocolate mixture.

In a small bowl, add 1/4 cup of flour to chopped Symphony chocolate bars and toss to coat.  Fold in to chocolate batter.

Pour batter and spread evenly into prepared pan.  Sprinkle half of your toffee bits over the batter.

Bake for 20 minutes, then tap pan on it's oven shelf to break up air bubbles, bake for additional 12-15 minutes.  Toothpick should come out clean or a couple small crumbs, not coated in batter.

Cool to room temperature, and then refrigerate for 4-8 hours, mine was overnight!  If you do not refrigerate, these brownies are cake-like and crumbly, which is fine if you like that, but they are fudge- like once they've been refrigerated!


Coffee Glaze

-2 c. powdered sugar
-2 Tbsp. melted salted butter
-2 tsp. vanilla extract
-3-4 Tbsp. strong brewed coffee

Add melted butter, vanilla, and 3 Tbsp. coffee to powdered sugar and whisk until smooth. Add more coffee for a thinner glaze.

Pour over brownies, and then sprinkle with remaining toffee bits.

Cut into 24 large brownies and serve!


Fried Ice Cream and Strawberry Margaritas!


Cinco de Mayo is Sunday.  Here in America, it's a great reason to get out, immerse yourself in the culture and enjoy some authentic Mexican cuisine and drink.  If you can't get out, today I'm bringing it to you!

Now, who remembers Chi-Chi's?  If you've never heard of the place, it was a "Mexican" restaurant chain and we had one locally.  My recollection was that the food was terrible, and the restaurant seemed kinda dark and for lack of a better word, gross.  Perhaps just some of the reasons Chi-Chi's are no more.   But that didn't stop my friend Betsy and I from going to munch on free chips and salsa and share a fried ice cream.  We were cheap...we were high schoolers.

Anyway, what matters about this story is that the fried ice cream ROCKED.  I think back then your choices of toppings were chocolate, strawberry, and honey-I'm iffy on the strawberry existence.  Now, normally I'm a chocolate girl, 110%, but there is something about honey on fried ice cream that makes it AMAZING.

I miss good fried ice cream, but I'm here to say that if you miss it too or are just curious to try it, you must make this recipe because it is easy and delicious.  Plus, if you're trying to find an excuse to eat fried ice cream, then it's in celebration of Cinco de Mayo!

Disclaimer!  This is not authentic "fried" ice cream, but an amazing riff on the real thing.  Authentic is a breaded ice cream ball that has been deep fried.  If you can get your hands on some of the real thing, then obviously you must have it.


Fried Ice Cream
adapted from The Imperfect Housewife

*I chose to make this in 8, individual 4 oz. Glad containers for portion control and one 8x8 pan to take to work.  You could do a 9x13 or any size you prefer.  My ratio of crumb is same amount on top as on the bottom.

-1 stick salted butter
-6 c. cornflakes, crushed
-1 c. granulated sugar
-1.75 qt. vanilla bean ice cream
-8 oz. container whipped topping, like Cool Whip, thawed
-2 tsp. ground cinnamon
-honey and whipped cream for topping, as desired

Remove ice cream from freezer.

In a large pot, melt butter over medium heat.  Add crushed cornflakes and sugar.  Stir constantly for 5 minutes.  Sugar will start to melt and flakes will start to brown and caramelize.  Immediately remove from heat and transfer to a bowl to stop the cooking process.

Prep containers.  Add 2 Tbsp. of cornflake mix to the bottom of each 4 oz. container and 1 c. to bottom of 8x8 pan.

In the bowl of a stand mixer, add ice cream.  Stir on low until it is smooth.  Add thawed whipped topping and cinnamon.  Mix on low until the ingredients are incorporated and mixture is creamy.

Work quickly to avoid a melty mess!  Add 2 level, 2 oz. scoops of ice cream mix to each 4 oz. container.  Add remaining ice cream mix to 8x8 and level with an offset spatula.  Top small containers with 2 more Tbsp. of cornflake mix, add lid and freeze.  Add remaining cornflakes to 8x8, cover and freeze.

Before serving, drizzle with desired amount of honey.  Whipped cream is optional, but yummy if you have it!

And...

Are you ready for this?!  First boozy beverage on Cookie Crazed Mama!   So how about something for Happy Hour to further celebrate Cinco de Mayo?!  Strawberry Margaritas!


Strawberry Margaritas
adapted from PBS

-16 oz. bag frozen strawberries
-1 1/2 Tbsp. sugar
-6 Tbsp. water
-4 oz. tequila
-3 oz. Grand Marnier, Cointreau, or Triple Sec
-2 small limes, juiced
-ice
-sugar or salt for rim
-fresh organic strawberries for garnish

In a medium size saucepan add strawberries, sugar, and water.  Bring to a simmer over a low/medium heat.  Continue to simmer for 30 minutes until strawberries break down and liquid appears dark and syrupy.  Remove from heat and blend in a food processor until mixture is smooth.  Pour mixture through a fine mesh sieve to remove seeds.  Transfer to a container and cover.  Refrigerate or freeze until cool.

In a cocktail shaker, add 1/3 c. strawberry puree, then layer with tequila, Grand Marnier, lime juice, and a handful of ice.  Shake and divide into two glasses with ice, rimmed with salt or sugar- I prefer sugar!  Garnish with a fresh strawberry.


Now sit back and relax!  You deserve it!

(Better Than) Samoa Cake


Tell me, have you heard of the "Better Than Sex Cake" before?  It's a pretty popular type of cake, and in this week alone I've seen two different, new versions of this cake.  And here I am, adding to the pile. Ah, well, we can't have too much of a good thing, can we?

Because, good?  This cake is so good it is BAD.


Inspiration always seems to flow this time of year when Girl Scout cookies make an appearance.  See my AH-mazingly yummy and equally devious Seven Layer Samoa Bars as proof.  It's also clear that Samoas seem to be a particular favorite of mine.  With those cookies on my brain and some time spent Pinterest trolling, I came across this popular recipe.  I'll admit it took a couple of days to really figure out what ingredients I wanted to use in my version, but if you make it, I think you'll believe this is kind of a home run too.

Better Than Samoa Cake has all the gooey goodness of the original, but kicked up with lots of caramel and coconut.  Add some chopped Samoas to the top if your feeling extra bad.


Better Than Samoa Cake

-Box of Devil's Food cake mix (plus ingredients to make it)
-14 oz. can sweetened condensed milk
-10 oz. jar salted caramel sauce
-12 oz. Cool Whip, thawed
-4 oz. softened cream cheese
-13.4 oz. can dulce de leche
-2 1/2 c. sweetened shredded coconut

Bake your cake according to the 9x13 pan directions on the box.  Remove from oven and immediately poke holes all over the cake.  I use a large serving fork.  Slowly pour sweetened condensed milk over the top of the warm cake using an offset spatula to work it in.  Set aside and let cake cool completely.

Evenly spread caramel sauce over the top of the cooled cake. (I use Trader Joe's salted caramel sauce; it isn't as sweet as sundae caramel sauce). Place in the fridge.

In a large bowl, beat cream cheese and dulce de leche together with a hand mixer.  Add 1/3 of the Cool Whip to the bowl and fold until combined.  Add the remaining Cool Whip and coconut and fold until no large streaks of caramel remain.  Spread over the top of cooled cake and return to fridge while you make chocolate sauce.

Chocolate Sauce
-2/3 c. bittersweet chocolate chips
-2 Tbsp. heavy cream
-1/4 c. powdered sugar, sifted
-2 Tbsp. warm water

Set bowl with chocolate and heavy cream over a pot of simmering water.  Let stand for 3 minutes.  Remove from heat and stir until all chocolate is smooth.  Stir in powdered sugar.  Slowly stir in water until you achieve your desired pouring consistency.  Add chocolate sauce to squeeze bottle, piping bag or ziploc and drizzle over the top of your cake.

Refrigerate cake until almost ready to serve.  Let cake sit at room temp. for about a half hour before serving to let caramel soften up and make it easier to cut and serve.


It won't last.  Trust me.


Pin It

Strawberry Kahlua Brownies


If you follow me on Facebook (which you should, if you don't) then you know my intention was to share this perfect Valentines Day recipe yesterday...on the actual day.

Well, I guess I ended up enjoying my day a little too much.  By the time it got down to doing the leg work of writing out the recipe it was late and I was opting between relaxing with a new bottle of wine or typing out a post.

Come on, say you'd choose the wine too.

My dedication to the blog may seem lacking, but once you've made these brownies, I'm hoping that all is forgiven!  These brownies are dense and fudgey.  Once hot out of the oven, they're topped with Kahlua and cream.  A creamy fresh strawberry buttercream is perfectly spread over the top and finished with some Kahlua ganache.

I love them!  I love the flavor combinations.  I love the textures.  It's my idea of a perfect romantic dessert; chocolate, strawberries, and BOOZE.  *Happy dance*


Strawberry Kahlua Brownies
adapted from Desserts by the Yard

-3/4 c. plus 2 Tbsp. AP flour
-1/4 tsp. salt
-1/2 c. freeze dried stawberries
-4 oz. unsalted butter, cubed
-1 oz. unsweetened chocolate, chopped
-7 oz. semi-sweet chocolate, chopped
-2 large eggs
-1 c. sugar
-4 Tbsp. Kahlua
-2 Tbsp. heavy cream

Preheat oven to 350 degrees.  Line a 9x9 inch pan with parchment paper.  Coat evenly with a non-stick cooking spray.

Sift together flour and salt.  Add 1/2 c. freeze dried strawberries.  Set aside.

Melt butter, and chocolates in a microwave safe bowl at 50% power for about 2 minutes.  Stir after each 30 second interval.  Stir until chocolate is smooth.  Cool for about 10-15 minutes.

While your chocolate is cooling, in the bowl of a stand mixer beat eggs and sugar until they are fluffy.  Remove bowl from mixer and slowly hand whisk in chocolate mixture.  Fold in the flour and strawberries until no flour streaks remain.  Your batter will be very thick and sturdy.

Spread evenly into your prepared pan and bake for 22-25 minutes, turning pan halfway through.  A crust will form on the top, and a toothpick will NOT be clean because these are fudgey.  Remove and immediately poke holes all over the top with skewer, fork, etc...Combine Kahlua and cream and evenly pour over the top.

Cool completely before adding buttercream to the top.


Strawberry Buttercream
adapted from Confessions of a Tart

-2 egg whites
-1/2 c. sugar
-pinch of salt
-6 oz. unsalted butter, softened, cut into Tbsp. size pieces
-1/2 tsp. vanilla extract
-4 oz. fresh strawberries

Puree strawberries in a food processor.  Run puree through a fine mesh sieve to remove seeds and set puree aside.

Add eggs, sugar, and pinch of salt to a heat-proof bowl and set over a pot of simmering water.  The water should not touch the bottom of your bowl.  Whisk constantly until the eggs and sugar are hot to the touch and you feel no sugar granules.  All the whisking should make the mixture white and bubbly looking.

Transfer your egg mixture to the bowl of a stand mixer with whisk attachment and whisk on high speed until stiff peaks form and they appear glossy.  Still on high speed, add butter one piece at a time, incorporate before adding another piece.  It may start to take on a curdled look, but keep whipping and it will become smooth.

Once smooth, change to a paddle attachment.  On a low speed, slowly add vanilla and strawberry puree.  Beat on a low speed until the buttercream starts to come together and appears smooth and creamy. Spread evenly over cooled brownies.  Place in the fridge.


Kahlua Ganache
adapted from the Joy of Baking

-4 oz. semi-sweet chocolate, chopped
-4 Tbsp. heavy cream
-1 Tbsp. Kahlua

Bring heavy cream to low boil, stirring constantly.  Pour hot cream evenly over chocolate and let sit for 5 minutes.  Stir with a rubber spatula until smooth and shiny.  Add the Kahlua and stir to combine.

Remove brownies from fridge, remove from pan and cut into 16 squares (do not cut if spreading ganache over the entire pan).

I let my ganache sit for a few minutes and added to piping bags to create the hearts on the top.  You could opt for something easier by drizzling or spreading over the entire batch of brownies.  Let the ganache set up before serving.

Serve immediately or return to fridge until ready to serve.

Yummy. Yum. Yum.

Pin It


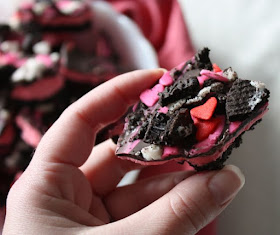
Love Bark


Ah, Love Bark.  It reminds me a lot of the real thing.

It's sweet.  It's messy.  And no matter what, you can't help but going back for more and more.

I'll stop there.  If I keep looking for more analogies it might get a bit deep in here, and after all Love Bark is just candy!  However, it is THE perfect candy for Valentines Day.  Because even if we aren't all big on celebrating the holiday, who wouldn't love you if you brought a bowl of this in to share with co-workers?!


Love Bark 

Bottom Layer:
- 24 Double Stuf Oreos (you'll use the remaining for last step)
-1/4 c. salted butter (melted)

Line a 9x9 pan with parchment paper, leaving a parchment overhang.  Coat evenly with non-stick cooking spray.

In a food processor, pulse Oreos until they are a fine crumb. (Can be done with a rolling pin if you're looking to release some stress)  Pour the melted butter over the crumbs and pulse until the mixture starts to form together and it appears wet.  Spread mixture evenly over prepared pan and press down firmly.  Place in the freezer while you work on the next layer.

Middle Layer:
-1/2 c. unsalted butter, softened
-1/2 c. vegetable shortening
-1 Tbsp. vanilla extract
-several drops red food coloring (if desired)
-3 c. powdered sugar

In a bowl of stand mixer, cream together butter and shortening.  Add in vanilla and food coloring.  With mixer on low speed add powdered sugar 1/2 cup at a time.  Beat on high until filling is fluffy and smooth.

Remove crust from freezer and evenly spread filling over the top using an offset spatula.  Return to freezer for 5-10 minutes or until filling is firm to touch.  Grab parchment overhang and remove your semi-completed bark from pan.  Place on level surface.

Top Layer:
-3/4 c.  chopped chocolate candy bark
-1/4 c. pink chocolate candy melts
-remaining Double Stuf Oreos, chopped
-Valentine candy sprinkles/decor of your choice

*You'll want to have everything ready because you will need to work quickly*

In a small bowl add your chopped Oreos and sprinkles.  

Place a glass bowl with chocolate bark over a pot of simmering water.

In a microwave safe bowl, add pink candy melts.

Once you notice your chocolate bark is 75% melted, start microwaving the pink candy melts on 30 second intervals.  Stir or whisk well after each interval so you do not over heat or the melts with turn gritty and hard.  The idea is that the chocolate and pink melts will be melted and ready at the same time. 

Quickly spread your chocolate over the top of your semi-completed bark using offset spatula.  Then drizzle the pink over the top in a back in forth motion and gently use a butter knife to create a swirl pattern by going the opposite direction in back and forth motion.  Quickly top with chopped Oreos and sprinkles.

Return to freezer.  To chop, take a pointed knife, and use the point of the knife to press down into the bark and gently wiggle back and forth to break apart.  Continue until you get desired amount and size of pieces.  Store in the fridge until you are ready to serve.


If you're on some dieting agenda, make sure you have a plan to get this stuff out of your house.  It is inevitable you will keep going back for more.  I also HIGHLY recommend you try the original source- Sally's Baking Addiction for the recipe because I made it for Christmas and it is AMAZING.  Um, it has peanut butter.  'Nuff said.

Take a peek at some of my other V-Day inspired recipes:

                  AND
~Chocolate Raspberry Cookie Bars

Also, I'm back linking up to parties!  Go check out all the other yummy treats at:
Chef in Training and Inside BruCrew Life!

Pin It

Salted Honey Pie


I've been obsessing over this pie for what feels like ages.  It has been in a desktop folder before I even knew what a Pinterest board was...you know, the dark ages.

Anytime a recipe crosses my path with the word "Honey" in it, I immediately take pause.  It isn't too often that honey is a prominent ingredient, prominent enough that you can distinguish its flavor.  And this pie isn't messing around when it comes to the honey.

We're not talking just a couple tablespoons here, but a full 3/4 cup!  So I hope you have plenty of honey on hand.  This pie is really very simple, but you may find the only ingredient you don't have is white cornmeal, perhaps the vanilla paste too.  At least go gather the cornmeal, you can find it at any grocer (I assume) more easily than vanilla paste, then make this goodness and put it in your mouth!  Because this pie is the Bee's Knees!

Pun fully intended.


Salted Honey Pie
adapted from Four & Twenty Blackbirds
makes 1, 9 inch pie

Pie Crust
-Your own recipe or a pre-made shell (chilled)

Filling
-1/2 c. unsalted butter, melted
-3/4 c. granulated sugar
-2 Tbsp. white cornmeal
-1/4 tsp. fine sea salt
-3/4 c. honey
-2 tsp. white vinegar
-1 tsp. vanilla bean paste
-3 eggs
-1/2 c. heavy cream

-course sea salt for sprinkling finished pie

Preheat oven to 350 degrees.  Move rack to the bottom portion of the oven.

In a large bowl, combine melted butter, sugar, salt, and cornmeal by hand or hand mixer until it is a thick, paste like consistency.  Mix in the honey, vanilla, and vinegar until combined.

In a small bowl, lightly whisk up the three eggs.  Add the eggs and heavy cream to your honey filling.  Fold until all the ingredients are incorporated.  Pour into your chilled 9"pie shell.  Line your pie crust with aluminum foil or your special pie shields.

Bake on lower rack for 40 minutes.  Move to middle rack and remove pie shields from crust.  Bake an additional 20 minutes.  The filling will really, really puff up and will be slightly wobbly in the middle when you go to remove it.

Let cool for at least an hour to set, and sprinkle with your desired amount of course sea salt.  The salt helps offset the sweetness of the pie slightly.

Cut and serve with whipped cream.  Make it yourself if you can! You won't regret this decision!


Okay, I straight up admit I used a pre-made crust.  Courtesy of Mrs. Smith if you must know.  Judge me if you will, but I'll say this:

image source

Make a crust from scratch and you'll reduce people to tears.  Tears from a salty, sweet, creamy heaven.  Because this pie is already amazing.  The filling forms this über thin crispy layer that tastes like the perfectly burnt part of a marshmallow.  The inside is almost like a caramel, with a slight hint of texture and flavor from the cornmeal, but of course amazingly HONEY.

AND the whipped cream balances out the sweetness that may be overwhelming if you gobble up a whole slice like I did.  I'm a honey badger.  I don't care!

Pin It